I love setting my own photos as my Android wallpaper. It reminds me of traveling, friends, drinking, whatever. But not all pictures look good as my Android wallpaper. Pictures I’ve taken in landscape mode, for example, look like crap when I set them as my non-landscape wallpaper.
So what’s an Android user like me supposed to do? Follow these steps to make sure your Android backgrounds always look their best.
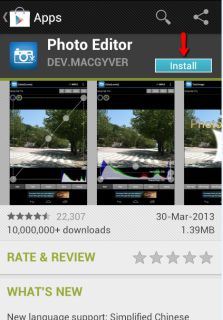
Step 1) Download a free app called Photo Editor
from the Google Play Store here
 Step 2)
 Open Photo Editor and choose
Gallery from the app’s homepage
Step 3) Choose the picture that you would like to edit
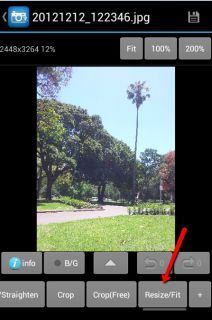
Step 4) Choose the desired resolution you would like your photo to be. Uncheck the box
Keep aspect ratio if you want to enter exact figures. If you don’t know your screen resolution, search Google with “[your phone’s name] + resolution”
 Step 5)
 After the photo has been resized, tap the green checkmark button on the top right corner of the screen to apply and save those changes.
Step 6) You can also use this screen to mess around with your photo in other ways. You can adjust the quality, for example, by tapping the disk option in the upper right hand corner of the screen. This screen also allows you to save an image as a wallpaper, which automatically sets it to appear on all your Android homescreens.

Forget about blurry, awkwardly-zoomed-in Android wallpapers. Thanks to Photo Editor, your Android wallpaper will always look its best.