- VirtualBox – if you still don’t have it in your computer, download and install it. It is available for Windows, macOS and Linux.
- The Android x86 ISO – you have to get the Android x86 ISO for any version of Android you want to try out. Android 6.0 Marshmallow is the most stable option available at the time of writing this article, so that’s what we’re using in the following steps.
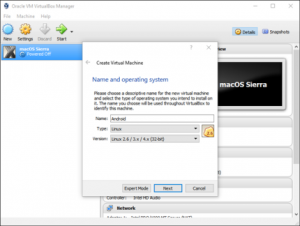
 Step 2: Type in your preferred name for the new virtual machine. In this example we named it “Android”. After that select the type of OS you have on your computer as well as its OS version and then click on Next.
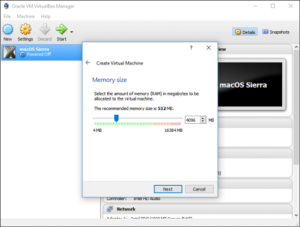
 Step 3: Up next, set up the virtual machine memory size. It is recommended that you allocate 2048MB memory size which is ideal for a 32-bit build of Android since it can’t handle anything more than that. However, if you have a 64-bit build, you can use as much memory as you please. After you’ve set up the memory size, click on Next.
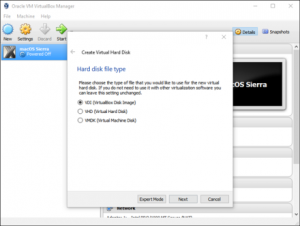
 Step 4: After that, click on Create to start creating your virtual machine. And then select the hard disk file type but you should just leave it as VDI (VirtualBox Disk Image).
 Keep the hard disk size set as Dynamically Allocated that will allow the virtual hard disk to expand as needed.
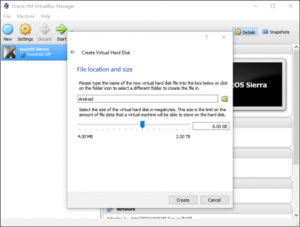
Step 5: In this step, you can select how much storage you would like to top the virtual machine out at. And even though it will dynamically resize, it won’t be allowed to expand past the size you have set here. So select whatever size will suit your system best.
Keep the hard disk size set as Dynamically Allocated that will allow the virtual hard disk to expand as needed.
Step 5: In this step, you can select how much storage you would like to top the virtual machine out at. And even though it will dynamically resize, it won’t be allowed to expand past the size you have set here. So select whatever size will suit your system best.
 Step 6: At last, click the Create button.
You are almost done, now all you have to do is to set up Android on your newly created virtual machine.
Installing Android on your Virtual Machine:
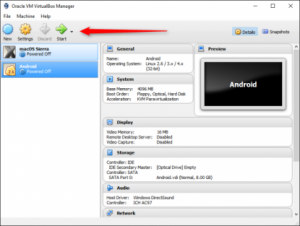
Step 1: With the prepped Virtual Machine, highlight it and click on the Start button located at the top.
Step 6: At last, click the Create button.
You are almost done, now all you have to do is to set up Android on your newly created virtual machine.
Installing Android on your Virtual Machine:
Step 1: With the prepped Virtual Machine, highlight it and click on the Start button located at the top.
 Step 2: Once the virtual machine starts up, point it to the Android ISO you downloaded. It will allow you to select this as soon as you start it, if not, you can click on Devices > Optical Drives > Choose Disk Image and then choose your Android ISO. After that use Machine > Reset to restart the virtual machine.
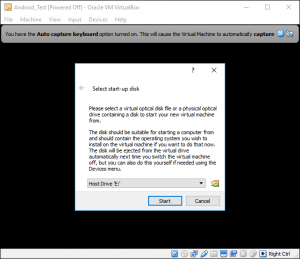 Take note that when you click the VirtualBox window, the mouse and the keyboard will be automatically captured. Just tap the right Ctrl on the keyboard to release both mouse and keyboard.
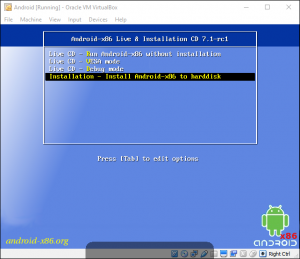
Step 3: After the virtual machine is done loading the ISO, use the keyboard to navigate down to “Install” and then press Enter which will start the Android installer.
Take note that when you click the VirtualBox window, the mouse and the keyboard will be automatically captured. Just tap the right Ctrl on the keyboard to release both mouse and keyboard.
Step 3: After the virtual machine is done loading the ISO, use the keyboard to navigate down to “Install” and then press Enter which will start the Android installer.
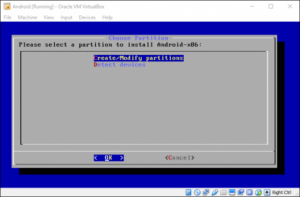
 Step 4: Select “Create/Modify” partitions. And on the GPI screen, select No.
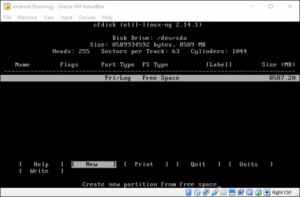
 Step 5: Select New located at the bottom of the disk utility screen.
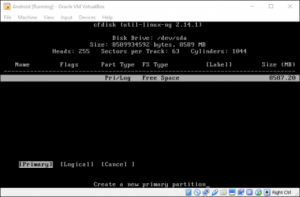
 Step 6: After that, create a Primary disk and allow it to use the entire virtual hard disk memory you’ve chosen earlier. In this example it is 8GB which should be selected by default.
 Step 7: Press Enter on the Bootable option to make the partition bootable and then select Write and press Enter.
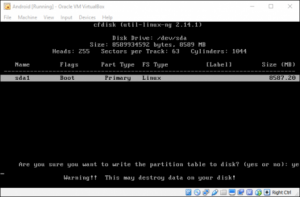
 Step 8: Type in “yes” and press Enter on the following screen to confirm that you want to write the partition table to the disk.
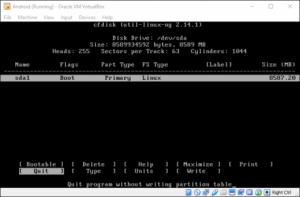
 Step 9: After it’s done, highlight the Quit option and then press Enter.
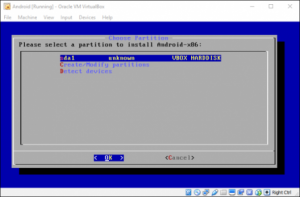
 Step 10: Choose the partition you created to install Android and press Enter.
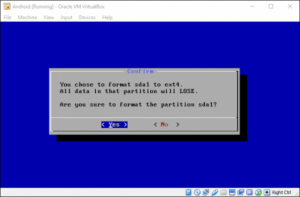
 Step 11: Choose “ext4” to format the partition and highlight Yes and press Enter on the next screen to verify.
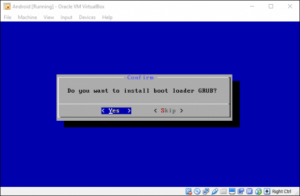
 Step 12: Select “Yes” to install the GRUB bootloader.
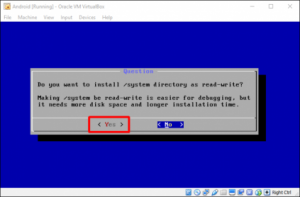
Step 13: Select “Yes” again to make the /system folder rewritable.

 Using Android in VirtualBox
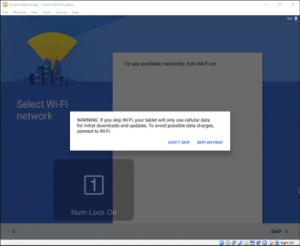
Starting here, all you have to do is to set this thing up just like you would on any Android device except that you don’t turn your Wi-Fi on, so the setup process is pretty much cut and dry. Take note that the virtual machine will use your PC’s connection.
Using Android in VirtualBox
Starting here, all you have to do is to set this thing up just like you would on any Android device except that you don’t turn your Wi-Fi on, so the setup process is pretty much cut and dry. Take note that the virtual machine will use your PC’s connection.
 Be reminded that this is not the fastest way to run Android applications on your computer. So if you want a faster way to do it and if all you want to do is run an application or two on your Windows PC, you can also try BlueStacks. However, one of the best things about running Android in VirtualBox is that the Android x86 provides access to a complete Android system in a virtual machine. And besides it is a good way to familiarize yourself with the standard Android system or to experiment with a virtual machine that runs on any other operating system.