 Step 1) Download WP8 Launcher from the Google Play Store (note: this link is not currently working at time of writing, as the team behind WP8 Launcher is fixing some install issues. But it should be available soon.
Step 2) Customize your tiles by resizing them and reshaping them to fit your perfect screen. You may want to make the apps you use most frequently – like Facebook and Chrome – larger than other apps.
Step 3) Change the color of apps that you want to highlight. Dave used the default blue color for most of his apps although he highlighted a few buttons by changing them to an orange color. The effect looks nice and it makes it easier to navigate.
Step 4) The WP8 Launcher app allows users to add any widgets to their homescreen. However, widgets will not automatically adjust to your new color scheme, so you’ll have to carefully choose widgets that don’t look out of place.
Step 5) To make your UI look exactly like Dave’s, as seen above, download an app called Alarm Clock Plus, Simple Calendar, and 1Tap Quick Bar and add them to the tile arrangement
Step 6) For more details abbot Dave’s transformation from Android into Windows, read this brief writeup by Lifehacker
Step 1) Download WP8 Launcher from the Google Play Store (note: this link is not currently working at time of writing, as the team behind WP8 Launcher is fixing some install issues. But it should be available soon.
Step 2) Customize your tiles by resizing them and reshaping them to fit your perfect screen. You may want to make the apps you use most frequently – like Facebook and Chrome – larger than other apps.
Step 3) Change the color of apps that you want to highlight. Dave used the default blue color for most of his apps although he highlighted a few buttons by changing them to an orange color. The effect looks nice and it makes it easier to navigate.
Step 4) The WP8 Launcher app allows users to add any widgets to their homescreen. However, widgets will not automatically adjust to your new color scheme, so you’ll have to carefully choose widgets that don’t look out of place.
Step 5) To make your UI look exactly like Dave’s, as seen above, download an app called Alarm Clock Plus, Simple Calendar, and 1Tap Quick Bar and add them to the tile arrangement
Step 6) For more details abbot Dave’s transformation from Android into Windows, read this brief writeup by Lifehacker
How to add Windows 8-style tiles to your Android
3 min read
Windows 8 was recently released amid a flurry of news and excitement – at least that’s what Microsoft wants you to think. Many consumers have been happy to stick with their Android smartphones and tablets while waiting to see if Windows 8 ever takes off.
But some Android users are intrigued by the Windows 8 interface. The colorful tiles do look pretty slick and the sharp edges work surprisingly well on touchscreen devices. And fortunately, Android users now have a way to add the best features of Windows Phone 8 to their Android smartphone or tablet.
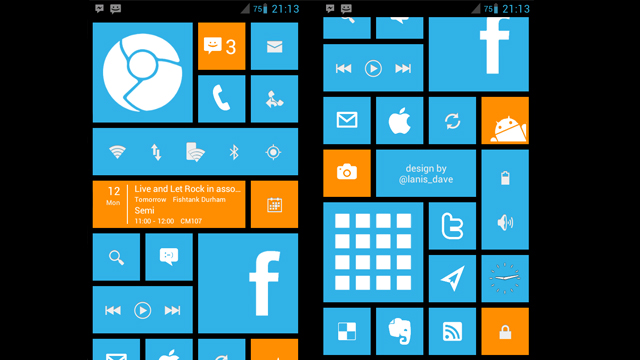
An Android fan named Dave liked the Windows Phone UI but he also liked the openness of the Android operating system. So he did what any enterprising Android user would do – customize his Android until he was satisfied that it closely resembled the Windows Phone UI.
Dave’s version of the Windows Phone UI – as seen at the top of this article – is actually based on an app called Windows Phone 8 launcher (yes, that’s an Android app). To complete the appearance of the app and make it look its best, Dave added custom widgets and skins to the tile arrangement. The result is impressive to look at.
Full details about Dave’s transformation can be found in this article, but this is basically how Dave did it:
Step 1) Download WP8 Launcher from the Google Play Store (note: this link is not currently working at time of writing, as the team behind WP8 Launcher is fixing some install issues. But it should be available soon.
Step 2) Customize your tiles by resizing them and reshaping them to fit your perfect screen. You may want to make the apps you use most frequently – like Facebook and Chrome – larger than other apps.
Step 3) Change the color of apps that you want to highlight. Dave used the default blue color for most of his apps although he highlighted a few buttons by changing them to an orange color. The effect looks nice and it makes it easier to navigate.
Step 4) The WP8 Launcher app allows users to add any widgets to their homescreen. However, widgets will not automatically adjust to your new color scheme, so you’ll have to carefully choose widgets that don’t look out of place.
Step 5) To make your UI look exactly like Dave’s, as seen above, download an app called Alarm Clock Plus, Simple Calendar, and 1Tap Quick Bar and add them to the tile arrangement
Step 6) For more details abbot Dave’s transformation from Android into Windows, read this brief writeup by Lifehacker
Newsletter
Get the latest tech news delivered to your inbox weekly.